|
Well things have certainly taken an unexpected turn at the end of our school year. I don't think any of us would have ever imagined that, going in to Spring Break, we would not be returning to school for the rest of the year. Unfortunately, with the Work From Home ruling on schools across British Columbia while we fight the corona virus, we no longer have access to the Adobe Creative Cloud programs that are licensed to the school computers. With that being said, we are moving forward with Media Arts, trying to be as creative as possible, and finding new ways of learning about digital creativity. This week we have started a unit on Film Analysis. Over the next couple of classes, we will be looking at what makes a movie "good" and giving you the tools and skills to think critically about film. With a little time, this unit may just forever change the way you watch and engage with movies.
We are starting this unit by looking at camera shots. Obviously, good movies don't just set up a camera on a tripod and shoot from a single, stationary point the entire time. Instead, directors use changing angles, proximity to subjects, and camera movement to help tell a story and keep the audience engaged. In a single movie scene, the shot we see as an audience member may change dozens of times or more. Put together, all these individual shots help convey emotion and feeling that propel the story forward and help the audience buy in to what is on the screen. On Monday's class, we learned about different styles of camera shots. These shots can be broken in to three main categories: Proximity to the subject, Camera Angle, and Camera Movement. If you missed class on Monday, or need a review, here is the document showing the shots we learned:
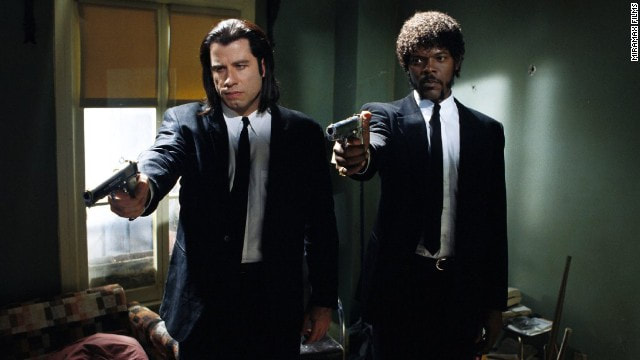
We also talked about a single-shot, a two-shot, and a three-shot, which refer to how many subjects are in a frame in a single shot. For example, this iconic still from Quentin Tarantino's Pulp Fiction is a two-shot, because there are two subjects within the frame. Additionally, it is filmed at eye-level and medium-range proximity.
:We also talked about establishing shots. Every scene should start with an establishing shot to help the audience familiarize themselves with what the setting is and what is going on. The establishing shot helps to establish the mood of the scene.
In today's class, we are putting our new knowledge of camera shots to practical use and practicing analyzing a scene from Whiplash (2014) to see how the director uses different shots to convey emotion and feeling throughout the scene. As you watch the scene, pay attention to what shots are being used and why you think the director chose to film that shot in that way. What does it add to the scene? The scene is posted below in two separate parts:
It is incredible how much the director does with varying camera shots in this scene. One of my favourites is the pan shot that goes back and forth between Miles Teller and J.K. Simmons. The shot shows Simmons conducting his band with his hands forming the shape of guns. He "fires off his shots" and the camera quickly pans to Teller, who responds by firing off his own "ratatatat" of the drums. The shot goes back and forth a few times as the characters trade shots of their own and engage in a tense and emotional battle.

A few minutes later, the director has an extreme close-up of both actors, and the show powerfully conveys the emotion of both characters as they share a smiling look of admiration and respect.
Both of these shots use different techniques by the director to further the story and draw the audience in to the emotion of the film. There are many more examples in this scene of how the director uses various shots to tell the story. Your assignment is to write one page analyzing at least five different shots from this scene and explaining how the director uses them to tell the story of this final scene. This assignment will be used to increase your Term 3 grade.
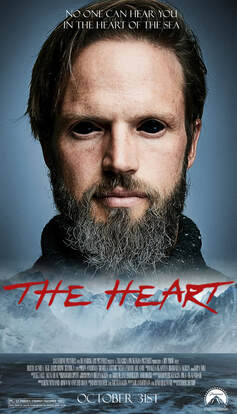
I love movies. I am not talking I enjoy watching a movie on a rainy Friday evening to finish off the week in a relaxing way. When I say I love movies I mean I LOVE sitting down to critically analyze the iconic flicks in film history. I love watching for the directors style - the cinematography, the use of colour, the way they set the scene and use what is not in the front and centre of the screen to tell the story just as much as what is on the screen. I love the use of music and sound. I love colour grading to convey emotions. I love directors who take risks and put their own style in to each work of art - as unique as a finger print, yet still inspired by those who paved the way before them. So naturally, I also love movie posters as I believe they help contribute to the movie by making a statement about the themes and plot points that the director believes are important. iSince the monster project, we have spent the past couple classes completing some smaller projects to gain a few more skills with Photoshop CC. First, we learned how to use the Curves Tool to black out a person's eyes while maintaining a lifelike gleam to them. Then we worked on putting an image inside of text so that it shows a picture instead of a solid colour. Finally, yesterday we learned how to fade one image in to another using the Gradient Tool like a poster might do. Today we are stepping back in to our creative roles to design something from scratch: Movie Posters! As a class, we looked at some movie posters for our favourite films online and developed the criteria for our posters as a group. We agreed the posters we created must have the following elements:
 Over the past few weeks, we have learned a number of new skills on Photoshop that have allowed us to edit and create new images. To demonstrate your understanding of these tools and your ability to use them creatively, your assignment is to build a monster of your own design. There is no tutorial or step-by-step instructions on how to create this project, but instead you must come up with a design yourself and show me what you know. Of course, as always, do not hesitate to ask questions if you get stuck or if you need feedback. As some inspiration for you, here are some projects created by past students:
Living in the digital age, it is nearly impossible to avoid the pressures to conform to ideal body images portrayed to us by models on Instagram, advertisements, magazines, and many other places. You are probably already aware that most of these photos that display unrealistic body expectations have been retouched to look better, but you may not have realized how easy it actually is to modify someone's body structure on Photoshop. Today you will find out just how easy it actually is to morph body parts using the Liquify Tool.
By the time we reached the final product of the billboard advertisement, the image looked nothing like the original model. We are creating ideals that literally not even the models can achieve - Yikes! Rather than having you edit photos of models, we are going to have a little more fun while learning the same tools. In this project, you will be creating avatar characters from James Cameron's Avatar. You may choose to do this project using a photo of yourself, a friend, or a picture that you find online.
Start by watching this video by InfoPuppet, which does an awesome job of walking us through the process. If you get stuck trying to only select the skin to turn it blue because the Quick Selection Tool is trying to select everything as well, try using a layer mask to adjust the Hue/Saturation, which we learned in our last project.
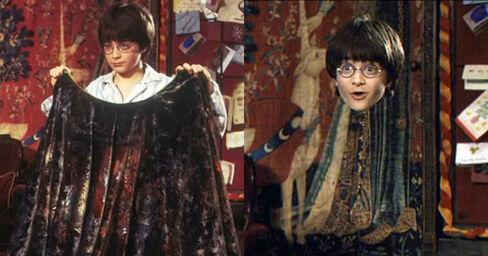
For our next project, we are going to be building an aquarium in side of an incandescent lightbulb. This project is going to expose us to one of the most useful tools you will learn on Photoshop this year: Masking. Creating a mask layer on Photoshop allows us to only show certain parts of the layer that we are masking without actually deleting the parts that we do not want to see. This means that we can make quick adjustments to the layer mask without undoing progress on other parts of our project. Think of creating a mask in Photoshop like the invisibility cloak in Harry Potter. Even though we cannot see Harry's body, it is still there underneath the cloak. Like the invisibility cloak, a mask allows us to see through one layer to what is behind it.
We will be using layer masks to put water and fish inside of a lightbulb. Start by watching the video below created by Photoshop Tutorials. It will explain each process of the project step-by-step.
All of the image files that you need to complete this project are available on the "Student Share" file on your computer or, if you are working away from school, you may download the files through the description underneath the video.
One of the all-time classics for Photoshop projects: the face swap. With the technologies available to us in Photoshop CC, creating a lifelike face swap has never been easier. The computer will work to analyze your different layers and seamlessly blend face and body together, but first we need to know the correct steps to set up our project for this transformation.
Watch the video by the Photoshop Training Channel below for instruction on how to complete your face swap master piece.  In this project, you will be designing a stage to display three products of your choosing on. You will learn how to use the Marquee Tool, as well as practice with using the Lasso Tool, using different layers and adjusting opacity levels. You will construct your stage and back drop using the Marquee Tool. You will cut three products out of a different image and place them on your stage. You will then duplicate your product layers, flip them vertically and adjust the opacity to give the illusion of a reflection on the stage floor. You will also be required to add a text layer to the background that relates to your project. This project is based strongly off of a project created by Lee County Schools in North Carolina. Click on the file below to download the instructions for this project.
 The next tool that we are going to be learning is the Lasso Tool. The Lasso Tool is handy for making selections around certain parts of an image and, in our case, cutting them out. The Lasso Tool has three functions, which can be revealed by right-clicking on the lasso tool to reveal all options for this tool. The basic Lasso Tool allows you to click and drag your mouse around the part of the object you wish to select. This is great for quick selections where you are not too concerned about precision. If you make a mistake and select too much of the image, you do not need to redo the whole selection. Simply press "Alt" and "-" and trace a line through your selection separating the part that you did not want to select. Likewise, if you did not select enough of the image, press "Alt" and "+" and continue your selection around the part of the image you wish to add to the selection. The Polygonal Lasso Tool makes selections by drawing straight lines from anchor points that you create by clicking around the image. Unlike the first Lasso Tool, you do not need to click and hold your mouse as you drag. Simply click on one spot along the edge of the item you want to select and you will drop your first anchor point. From their, you will draw a straight line to wherever you move your cursor. Click a second time to drop a new anchor point and set your line in place. Do this around the whole item you are selecting to make your selection. Remember, more anchor points will make a more accurate selection along rounded edges. If you are wanting to make a selection quickly, the Magnetic Lasso Tool is great because Photoshop will place the anchor points for you by looking for edges in the image where the colour of pixels changes significantly. Simply click to drop your first anchor point along the edge of the item you want to cut out and then move your mouse around the edge of the object while Photoshop places the rest of the anchor points. This is not a flawless process - sometimes the computer selects the wrong thing - but if you have an object that you want to cut out of a solid coloured background, the Magnetic Lasso Tool will get the job done quickly and accurately. If an incorrect selection is made, press "delete" to remove the last anchor point and back up to where your selection is right. Now for your assignment! You will be creating a landscape design using food as your building blocks. You will need to find a landscape photo to build on as your backdrop, as well as different pictures of food, which you will use the Lasso Tool to cut out and place on your backdrop. You will be expected to create multiple layers using the "new layer" button. Use your creativity and have fun constructing your artwork.  Welcome to your first Photoshop project of the semester. Over the next few classes, we will be learning how to use some of the basic tools that allow us to edit, retouch, and manipulate images using Photoshop CC. Your first assignment is designed to help you learn the Brush Tool. The Brush Tool is a basic tool that allows you to draw by clicking and dragging the mouse. Complexity can be added to your brush work by adjusting the size, shape, and opacity of your brush strokes. Although it is simple in function, we will use the Brush Tool regularly as we navigate through Photoshop in this course. For this first project, you will take an outlined colouring-page image and fill it in using your brush tool. You will be expected to try different brush shapes and opacities to create the effect of shading and different textures. I have provided some outlined portraits for you to start - you can find them in the "Student Share" file - or you may choose your own image on the internet. You will have four classes to complete this assignment. /10 marks |
Media ArtsMedia Arts allows students to express self, identity, and culture through the use of digital tools. In this class, we explore creative expression through the use of Photoshop, Illustrator, and Lightroom. ArchivesCategories |
||||
 RSS Feed
